Scrapbooking Tools and Tips

Scrapbooking  Tools and Tips

Why Scrapbook?

After years of family celebrations, vacations, and holidays, we’re sure you’ve made plenty of memories. Make those moments last for years to come with special keepsake scrapbooks for you and your grandchildren. Plus, you don’t need to be particularly crafty or buy expensive materials to preserve photographs, art work, and other precious documents.

Scrapbooking  Tools and Tips

First things first—you’ll need a scrapbook to get started. Your local craft store will have plenty of options, but no matter what you choose, make sure that the book comes with paper that will protect your photos and other keepsakes from deteriorating over time.

A tried-and-true brand is Kolo, which makes memory books in a variety of colors and sizes, plus, their pages, which will serve as the backdrop for your photos, are acid-free—perfect for your archives.

Stick It!

When you have your scrapbook and your photos ready, you’ll need a strong adhesive to make sure everything stays in place on the page. Skip the sticky white school glue and opt for Glue Dots. Designed specifically for craft projects, Glue Dots won’t have an adverse affect on your photos or materials. Plus, they come in an easy dispenser to keep mess to a minimum.

Pretty Papers

Create the perfect backdrop for your memory pages with customized paper. Your local craft store is bound to have dozens of paper options to choose from in a variety of designs.

The standard size is usually 12×12, so make sure your scrapbook matches if you’d prefer not to cut them down. While these papers aren’t required—most scrapbooks come with plain white or black background papers—they serve as an easy way to add color to your book.

Tools of the Trade

Once you have your book, adhesive, and paper, the last basic tool is scissors. Sharp scissors should be able to provide an even cut through paper and photos, but bigger projects may require a paper cutter. Fiskars makes a paper cutter sized for scrapbooking projects, so it won’t take up too much space on your shelf.

Put Your Own Stamp on It

One of the easiest ways to adorn your scrapbook is by using rubber stamps and lively, colorful inks. Stamps range in size from very large (for backgrounds and borders) to small (for accents). For example, to accent a page dedicated to the birth of a granddaughter, you might want to use a baby bottle or “It’s a Girl!” stamp.

Stores like Michael’s and Joanne Fabrics will have tons of stamps in different designs, from basic stars and hearts to ornate landscape settings. You will also be able to find a wide variety of colorful ink pads. Plus, many holiday stamps can be recycled for other craft projects, like cards and gifts.

Knockout Punches

Create a merry display of memories by adding accents and borders. One way to do this: Skip the scissors and pull out the puncher. Hole punches have come a long way—now they can create shapes like hearts, stars, butterflies, bears, and more. Queen of crafts Martha Stewart has her own line of punchers that will create beautiful borders on paper, from ric rac to scalloped.

Accessorize with Stickers

As you compile photos and other keepsakes (movie stubs, sports tickets, etc.), organize them into themes or events that you can build pages around. Then, when you hit the craft store, make sure to browse the sticker section for sets that match.

Jolee’s makes sticker sets for just about every occasion, from birthdays and holidays to vacations and sporting events. Look out for their dimensional collection to give your scrapbook depth.

Lay It All Out

Now that you have all of your supplies gathered and you’re ready to assemble your scrapbook, take some time to mock up the layout of each page before you start gluing things down. This will help limit mistakes and make sure your memories are preserved perfectly.

Family Life & Living 7 Job Search Tips and Tools for Millennials

Family Life & Living

Family is the cornerstone of a complete home. Explore our practical advice, struggles and personal stories on how to harmonize your modern family life.

7 Job Search Tips and Tools for Millennials

Parents of young adults and Millennials deserve to feel proud of their kids and also give themselves a self-congratulatory pat on the back when their child graduates from college. For those graduates who are ready to start working and beginning a job search, the hunt should begin not after graduation, but in the beginning of their last semester of college. As everyone is aware, job hunting is so much more than it was when the parents of Millennials were young, and companies would go to a college campus ready to offer positions to eager young men and women, or resumes were mailed in response to want-ads in the newspapers. Looking for a job involves so much more now.

01 of 07

Be Prepared for a Lot of Work

For a lucky few, jobs are easy to find and they graduate on Friday with a new job waiting for them on Monday. For most graduates, however, graduation is just the beginning of one of the toughest times in a young person’s life – finding the right first job. In this situation, it’s important to look at finding a job as if it actually is a job. Keeping a schedule, getting up each morning at a reasonable hour, tracking contacts, following up with inquiries, even pounding the pavement a bit – all of these things can not only help with the job hunt, but they can keep a young job seeker from feeling aimless and disappointed. Just like getting into college, finding the right job takes time, focus and enthusiasm. 

02 of 07

Find the Best Job Search Sites

There are so many job search sites online, and it’s difficult to determine which ones are the best. These are some of the highest ranked by a variety of sources.

Glassdoor.com
Indeed.com
JobIsJob.com


Also check out niche job search sites, which can take a job seeker directly to jobs that are specifically for their particular skills or interests.

03 of 07

Find a Mentor

Finding a mentor ideally begins long before graduation. Through internships, volunteer work, part time jobs or with professors, finding someone to give advice and guidance is invaluable and can make the difference between finding a good job and the right job. Mentorship can be either a natural development between two people or, in some cases, students can request someone they admire to mentor them. Either way, finding guidance and help for the job search is a great way to improve the chances of getting a job that is fulfilling and exciting.


Search for role models you can look up to and people who take an interest in your career. But here’s an important warning: You don’t have to have mentors who look like you. Had I been waiting for a black, female Soviet specialist mentor, I would still be waiting. Most of my mentors have been old white men, because they were the ones who dominated my field.

04 of 07

Use Social Media to Your Advantage

The first thing any new job hunter needs to do is create a LinkedIn profile. Take the time to make it as clean, intelligent and positive as possible. The next thing to do is clean up their social media profiles. College was a lot of fun, but employers don’t need to see your spring break or sorority mixer photos. Take down any images that are less than flattering or present a party image to employers.

LinkedIn is also an excellent source for job listings.

Get a professional head shot for all of your job search profiles. If you don’t have the funds or access to someone to take a good head shot, find a photo of you that you particularly like, crop out anyone else and fix it up with a site like PicMonkey.

05 of 07

Take A Risk

If there was ever a time to test the waters in the job world, it’s now. Graduating from college with a degree doesn’t automatically mean a young adult is certain of what they want to do for a career. Trying out something that interests them but perhaps doesn’t pay as well as they’d like is better done when they are just getting started, than a few years into their careers when they will have established expenses, perhaps a family, and not as much wiggle room to take a risk.

For some young adults figuring out what to do can be more difficult than finding a job. There are unique careers that may fit the bill for an undecided job seeker.

06 of 07

Go Where the Jobs Are

Finding a job can be much easier if college graduates are prepared for the job market they are heading into. Research should begin before a college major is declared, even before the search for a college begins. Heading to college with a specific career in mind, one that is growing and has increasing opportunities, can take a lot of the stress off of finding a job upon graduation. Some of the hottest current job markets include data scientist, computer systems analyst, financial planner, physical therapist and social media manager. Whether a major is declared as a freshman or a young adult graduates with a degree not knowing what to do next, looking for where the most jobs are available is a good way to start the job search.

07 of 07

20 Resolutions Everyone Should Make

20 Resolutions Everyone Should Make

Wonderful list! I hope 2017 is the year for you to love yourself and enjoy life better than ever! 🙂

Totally awesome list – print this out and put it in a location that you will see every day of the New Year 2017! ♥ 🙂

It’s time for New Year’s resolutions. Most of us have a love-hate relationship with this once-a-year list. Maybe the same few goals keep popping up year after year, or maybe you throw it all out the window and say screw the list.

There’s a reason traditional resolutions don’t stick. Things like losing weight, ending a nail-biting habit, or paying off debt are all good goals. But it can be hard to put your heart into them.

If you really want to reach new heights, consider writing your goals with more heart and intention. Focus on the feelings you want to feel in the New Year and the big picture.

Instead of writing down “lose weight” or “hit my goal weight,” make a resolution to feel good in your skin and fall in love with your body. This empowers you from within, and you’ll create goals with your heart. When your heart is your compass, you’re more enthusiastic and focused.

20 Resolutions Everyone Should Make

If you want to feel more alive and present in your life, consider revising your New Year’s resolution list. Here are 20 things to consider:

1. Release what no longer serves you.

2. Live less out of habit and focus on intent.

3. Raise your standards.

4. Look for the good in others instead of focusing on the bad.

5. Be OK with not being OK.

6. Look in the mirror and like what you see.

7. Be kind to yourself when you’re learning something new.

8. Be OK with not knowing. Learn to love the journey.

9. Stop apologizing.

10. Let love guide you.

11. Stop rushing things that need time to grow.

12. Know the difference between giving up and knowing when you’ve had enough. Let enough be enough.

13. Travel to that place you keep thinking about. It’s in your heart for a reason.

14. Trust yourself more.

15. Let go of who you think you are so you become who you want to be.

16. Be thankful for today.

17. Don’t worry about how your life looks. Instead, focus on how it feels.

18. Invite your inner child out to play daily.

19. Let yourself be you.

20. Stop trying so hard to get to where you think you should be and see you are exactly where you need to be.

12 Things You Should Never Throw Out When Downsizing

12 Things You Should Never Throw Out When Downsizing

These are the items that are worth finding space for in a new home.

When you’re packing to move or making over a room, it’s the perfect time to take a hard look at all your stuff — and purge. Just be careful how trash happy you get with these few things.

1. Family heirlooms
Evaluate what you have and ask yourself which ones are meaningful to you and your family now, says Jodie Watson, an organizing expert and owner of Supreme Organization. “These are the ones to keep and take with you to your new home,” she says.

2. Electronics of any sort
Hold on to them until you’ve completely wiped out all your personal information. “I can’t tell you the number of people who go on massive de-cluttering binges and don’t take the time to clear all their personal information,” warns Geralin Thomas, a professional organizer and owner of Metropolitan Organizing who has also worked on A&E’s Hoarders.

3. Photographs
You may need to digitize these, but you don’t want to lose them,” says Barbara Reich, a professional organizer.

4. Important paperwork
When it’s time to clean out or pack up a house, let go of as much paper as possible, says Reich. But look out for important stuff like birth and death records, marriage licenses, social security cards, retirement documents, medical records, insurance policies, and more that might be mixed into a pile headed for the recycling.

5. A landline phone
You never know when your cell phone’s battery or service might go dead. “Keep at least one,” says Thomas.

6. Collections
“You have obviously enjoyed collecting these items, so select the few items that you value above all the rest,” says Watson. Whether it be dolls or decorative glassware, it’s better to display and enjoy a few than to have the whole collection boxed away in storage.

7. Fine jewelry AND the boxes they came in
“Having a piece of jewelry in it’s original box adds value when reselling it and keeps the piece of jewelry in mint condition,” says Thomas.

8. Extra kitchen and bathroom supplies
Only keep what you need and use from the kitchen, like pots and pans, a good quality chef’s knife, a spatula, a wooden spoon, countertop appliances you use a lot like a blender, and crucial linens. “If you have duplicates, you can donate them, but make sure you have the basics with you,” says Reich. And the bathroom? “You should bring two sets of sheets per bed (one on the bed, one to change) and four towels per person,” she says.

9. Decorative and sentimental items that bring back precious memories
Hold on to things like a lock of hair from your child’s first haircut or the medal you won for running a marathon, says Reich. “These are items that you would not be able to replace,” adds Watson.

10. Emergency supplies 
A radio, batteries, a flashlight, and a first aid kit should all be on hand when you move into a new home, advises Reich. “And if you don’t have emergency supplies, now is the time to get them!”

11. Tags from expensive handbags
“If you ever are consigning them, tags will help you prove authenticity and bring a much better price,” explains Thomas.

12. Medication and toiletries that haven’t expired yet
Replacing these can be expensive. “Medication taken daily should be kept with you during the move,” warns Reich.

How do you tell what is TRULY meaningful? 
Watson says this is her favorite trick: “In any given category, like artwork, ask this question, ‘If I could only take three pieces with me, which three would they be?’ With books, the question might be, ‘If I can only take 20 with me, which 20 would they be?’ This will help you discover the items that are the musts to take with you; the rest is negotiable.”

Kate from learnandgrowbooks.com

Kate is the founder of Learn and Grow Books, which is a website for parents and teachers of pre-K children.

Pumpkin Carving Party Invitations

Pumpkin Carving Party Invitations

One of the best parts of Halloween is carving the pumpkin. This Halloween, why not gather a few friends together and throw a pumpkin carving party?

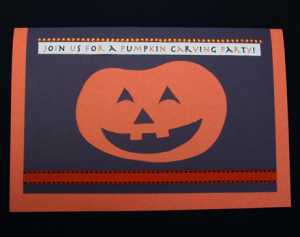
Keep the party laid-back by making it a homemade affair. There’s no need to spend money on store-bought invitations when your budding artist can create adorable ones personalized with her own stylish touch at home. This smiling paper pumpkin is sure to bring ghoulish cheer to all who receive him.

What You Need:

  • 1 sheet black construction paper
  • 2 sheets orange construction paper
  • 1 sheet white paper
  • Orange and black ribbon
  • Pair of Halloween-themed brads
  • Pencil
  • Craft glue
  • X-acto knife
  • Crystal stickers, beads, or any other embellishments

What You Do:

    1. Fold one sheet of orange paper in half like a greeting card.
    2. Fold the black sheet of paper over it and trim it on all sides so that it is slightly smaller than the orange sheet. This will create an orange border for the card.
    3. Glue the black paper onto the orange.
    4. Ask your child to draw a pumpkin on the second sheet of orange paper.
    5. Parents, use an X-acto knife to cut out the pumpkin’s face.
    6. Have your child glue the pumpkin onto the card.
    7. Help your child handwrite the party title on the front of the card, or print it out from the computer.

Cut the white paper in half widthwise, then trim it down a little more so it fits nicely on the inside of the card. Help your child write the party details by hand on the white paper. Alternatively, type the party details on the computer, print them out, and cut the paper to fit inside the card.

  • Attach the party details to the inside of the card with a pair of brads. If you don’t have brads, simply tack it onto the card with glue.
  • Have your child embellish the card using ribbon, glitter glue, stickers, or beads.
  • To save time, print each guest’s mailing address onto labels and ask your child to stick them onto the envelopes.


Once all the invites are finished, set off for the post office and drop these beauties in the mail!

pumpkin-party-invitations-slide


Kate from learnandgrowbooks.com

Kate is the founder of Learn and Grow Books, which is a website for parents and teachers of pre-K children.

Patriotic Fruit

Patriotic Fruit

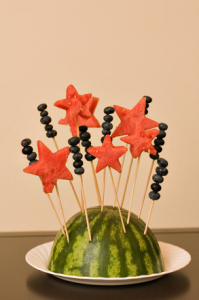
As hot summer days begin to stretch out before us, there’s nothing quite like the taste of watermelon. It’s cool, crisp and refreshingly sweet. The best part about it is that it’s even got a healthy boost of vitamins and fiber. It’s a great snack for kids to munch on, especially when there are seeds to spit! This Fourth of July, try making this patriotic fruit platter that is not only festive but nutritious and delicious as well.

This no-cook recipe is great for any age, but for kindergartens who are working on developing their fine motor skills, this is an especially fun project. To make your watermelon-blueberry platter, your child will use cookie cutters and kabobs, and she’ll practice the “pincer grip” that will help her later with handwriting. This is a recipe that friends and family will definitely enjoy!

What You Need:

  • 1 seedless Watermelon
  • 1–2 cartons of blueberries (amount depends on the size of your watermelon!)
  • 5-point star cookie cutter, about 1 ½ inches to 2 inches across (or one of each size, if you have a couple!)
  • Package of 7–8-inch bamboo barbecue skewers (50-75)
  • Bunch of fresh mint leaves

What You Do:

  1. Before you begin, make sure you have washed your fruit thoroughly, including the outside of the watermelon. For this dish, you will be using the rind as well as the flesh of the melon, and you’ll need to make sure that everything is clean!
  2. Use a sharp knife to cut the watermelon exactly in half, making two bowl shapes of watermelon. Then place one half on a table, so that the flesh is facing up, and use the knife to dig around the edge of the flesh, and separate it from the rind. Try to remove the flesh in one big chunk—or as big a chunk as possible!
  3. Then slice the watermelon flesh into large circles, each about ¾ of an inch thick.
  4. You will be left with one half of the watermelon with the flesh and rind intact together, the watermelon slices, and one round bowl of rind. Turn the rind over so that it makes a dome, and place it on a platter lined with fresh mint. Put it aside—you’ll be using it soon.
  5. The remaining half of your melon will be cut up as well, but this one will be a little easier, because you don’t need to keep the rind “dome” intact. For the second half, cut your watermelon into circles, rind attached. Each circle should be about ¾ of an inch thick (for this recipe, it’s better to make them thicker, not thinner if you’re unsure of the size). Then use a sharp knife to cut off the rinds, leaving a circle of juicy red watermelon intact.
  6. Now’s the time for your child to get in on the action! Lay all of the watermelon circles on a clean cutting surface and invite your child to use the cookie cutter to cut the flesh into star shapes. For your young learner, this is a great time to point out some early lessons in spatial thinking: many star cutters can “tessellate,” i.e. their points can be lined up side by side to make a repeating pattern—which will minimize your watermelon waste. See how many complete stars your child can make from one watermelon circle.
  7. You can expect to end up with some scraps, so feel free to munch on these along the way. When you and your child are done, you’ll have a lovely array of bright pink watermelon stars.
  8. Take out your skewers and have some fun! Help your child run a skewer through each star (through the length of the star rather than the width), leaving at least a half an inch at the top for people to grab. Make sure the pointed end of the skewer ends up on the bottom. Use the pointed end to poke the hole in the watermelon.
  9. Keep going to create a ton of watermelon star skewers! You can put as many watermelon stars as you would like on one skewer, depending on the size of each skewer and the size of your stars, but 3 or 4 should be the maximum amount for one any skewer.
  10. Help your child stick the watermelon skewers into the melon dome on your platter. You and your child can arrange them in whatever design you like.
  11. On separate skewers, have your child stick 5–6 blueberries on a skewer, again with half an inch sticking out on top, and place these blueberry skewers into your watermelon dome in the spaces between your watermelon stars. (For added color, if the fruit is available in your area, you can also try alternating blueberries with red raspberries or cherries!)
  12. When you and your child are done, you’ll have a simple, yet festive platter of delicious and healthy summer treats to serve at your next Fourth of July party. It’s sure to be a real crowd pleaser!


patriotic-fruit-slideshowmainimage

Kate from learnandgrowbooks.com

Kate is the founder of Learn and Grow Books, which is a website for parents and teachers of pre-K children.

Barbecue Ribs on a Gas Grill

Barbecue Ribs on a Gas Grill

Step 1 of 7

Barbecue Ribs on a Gas Grill

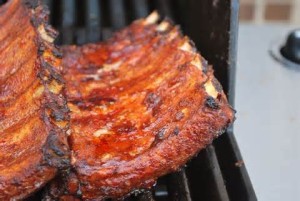
Cooking ribs which produces a genuine barbecue flavor by using a gas grill, is often a challenge. Gas grills are great for hot and fast cooking, but not so efficient when you need to turn a rack of ribs into tender, smoky barbecue. However, there are some tricks you can use. To get the best possible ribs from your gas grill, all you need is this three step process.

For this example, I am using a full rack of spareribs trimmed. You can use baby back ribs with this same method, but reduce the cooking time about 5 minutes per stage. Otherwise, the total cooking time will be between 1 1/2 and 2 hours.

Your gas grill must be large enough and contain at least two burners, since these ribs will be cooked indirectly. This means the heat will not be below the rack of ribs, but off to the side of the grill. I will explain the set up in detail as we progress.

What you will need:

  • one rack of ribs
  • a good Rib Rub
  • barbecue sauce
  • 1/2 cup apple juice
  • aluminum foil
  • fuel for your grill
  • wood chips for smoke
  • a sharp knife

Step 2 of 7

Preparing the Rack – Barbecue Ribs on a Gas Grill

It is seldom to find store bought spareribs that are properly prepared. You will need to do some basic trimmed before we get started. Ideally, what you’re looking for is a rack of ribs with a square shape and an even thickness throughout. Make sure you inspect the ribs for any loose pieces of meat or fat. Cut off any excess scraps or excessive fat from the rack. This doesn’t mean cutting all the fat off, just thick useless sections.

Since we are grilling these ribs faster than we would on the smoker , the benefit of the fat isn’t as great. We still need fat to keep the meat moist but, we don’t want to end up with an overly fatty finished product.

Once done trimming, rinse the rack of ribs with cold water and pat dry with paper towels.

Step 3 of 7

Rubbing the Ribs – Barbecue Ribs on a Gas Grill

Once the ribs are trimmed and rinsed, it is time to apply the rub. A good rib rub adds flavor but doesn’t overpower the meat. You want to apply the rub all over the rack. This means back and front as well as the side and ends. Apply as much rub as will stick. The natural moisture of the ribs will hold all the rub you need.

You can apply the rub up to an hour before you start cooking, but any longer will affect the texture of the meat, giving it a ham like flavor and consistency. If you need to return the rack to the refrigerator ofter putting on the rub, wrap it in plastic wrap and handle it gently. Preferably, try to get the ribs to the grill within 10 to 20 minutes. If doing so, it is okay to leave it out until the remaining preparations are made.

Step 4 of 7

Making Smoke Bombs – Barbecue Ribs on a Gas Grill

Making a proper smoke on a gas grill while cooking at lower temperatures is a real challenge. To be honest, while you might be able to give these ribs a hint of smoke, they are not going to have a strong smoke flavor. That is the sacrifice we make by using a gas grill. However, we are certainly going to give it a try by throwing in a couple of smoke bombs to generate smoke. This is a quick, easy, and cheap way to make smoke on a gas grill.

To make a smoke bomb start by placing about 1/2 cup of damp, but not wet, wood chips on a piece of foil. Wrap the wood chips so that one side has a single layer of foil. Poke several holes through the foil to let the smoke out. I’m using two smoke bombs, but you can use more if you wish.

Place the smoke bombs under the cooking grate as close as possible to the burner you are using. You will need to preheat the grill hot enough to get the combustion of the wood started. Once you see smoke coming out of the smoke bombs, turn down the heat and place the ribs on the grill.

Step 5 of 7

Placing the Ribs on the Grill – Barbecue Ribs on a Gas Grill

The grill placement is most important. We need indirect heat to cook our ribs without drying them out or overcooking them. We also need to be able to hit temperatures up to 375 degrees F. On the grill I am using, the burners run side to side instead of the more typical front to back. I am using the front burner for heat and putting the ribs in the back. This works because most gas grills vent out the back so the smoke I create in the front, will be drawn to the back of the grill.

If you have a grill with the burners running front to back, you will need to use one of the burners on either end. Lets say you are using the left most burner. This means you will place your smoke bombs directly over this burner (and under the cooking grate). The ribs will be placed as close to the right side as possible. If the rack is short enough to be placed running parallel to the burners, set it as far to the right as you can get it. Otherwise, you might have to place it in a more diagonal position on the grill.

Place the rack, bone side down on the grill, close the lid, and adjust the grill until it holds a temperature of 300 degrees F. Now, let the ribs cook for 30 minutes. Don’t open the lid. This will hold in as much smoke as possible. Don’t expect a lot of smoke to billow out of the grill as there won’t be a tremendous amount of smoke production.

Step 6 of 7

Wrap the Ribs – Barbecue Ribs on a Gas Grill

Once the ribs have been on the grill for 30 minutes, it is time to move on to the second stage. The ribs should be browned on all sides. If they appear raw on the surface anywhere continued grilling for another 10 to 15 minutes, otherwise, move on to the second phase. Now we are going to make the ribs tender by steaming them with apple juice. The secret is to wrap the ribs tightly in foil. You want to make it as water tight as possible after pouring in the apple juice.

With a tightly wrapped packet, place the ribs back on the grill in the indirect grilling space. Now close the lid and increase the grill temperature to around 375 degrees F. At this temperature the apple juice will boil, tenderizing the ribs and cooking them quickly.

Step 7 of 7

Barbecue Sauce – Barbecue Ribs on a Gas Grill

After the ribs have been steaming in foil for 30 minutes, it is time to turn down the heat and unwrap the ribs. They should be mostly cooked at this point. Look for the rack of ribs to be more flexible. If you pick up the wrapped rack on the end, it should droop down. If you open the foil and the ribs are not browned completely, close up the foil and continue grilling for another 10 to 15 minutes.

Once the ribs are ready to continue, set your grill temperature around 250 degree F, but definitely not more than 265 degrees F. (the burning temperature of sugar). Place the ribs back in the same place to finish cooking.

When smoking ribs it is up to you whether to add sauce or not. However, with the gas grill method I encourage the use of a good barbecue sauce. It adds authentic barbecue flavor to your ribs and adds to the surface texture of the meat.

The secret to a good sticky rib is multiple coats of barbecue sauce. The best method is to sauce one side of the ribs, close the lid and cook for 5 minutes. Then open the lid, flip the ribs and sauce the other side. Do this for 30 minutes and you will have a heavy coating of barbecue sauce.

Five minutes after you put on the last coat (at least 2 coats a side) take your ribs off, cut, and serve.

th

Barbecue Ribs on a Gas Grill


Kate from learnandgrowbooks.com

Kate is the founder of Learn and Grow Books, which is a website for parents and teachers of pre-K children.

Mexican Wedding Cookies

Mexican Wedding Cookies

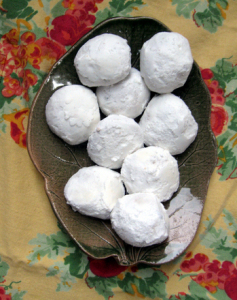
As can be guessed from the name of these scrumptious treats, they are a necessary component of any Mexican wedding or special occasion! Lots of flavor is extracted from just a few simple ingredients in this traditional “biscochito” recipe, said to have originated in Europe and been brought to Mexico via Spain. This tasty activity provides a fantastic opportunity to teach your little one about international foods!

Vary this recipe by choosing your family’s favorite type of nut. Some recipes use pecans, while others use hazelnuts, walnuts, or pralines.

Yield: about 2 dozen cookies.

What You Need:

  • 8 ounces butter
  • 1/2 cup powdered sugar
  • 1 tablespoon vanilla
  • 1/2 teaspoon salt
  • 1 cup very finely chopped almonds (or nut of your choice)
  • 2 1/2 cups sifted all-purpose flour
  • Powdered sugar for dusting

What You Do:

  1. Preheat oven to 350° F.
  2. Beat the butter and powdered sugar until light and fluffy, about 10 – 15 minutes.
  3. Have your child add vanilla, salt, and almonds.
  4. Once thoroughly beaten, remove from the mixer and stir in flour. Do not over mix! The dough should be fairly coarse.
  5. After showing him an example, ask your child to form the dough into small football shapes.
  6. Have your child lightly butter a baking sheet.
  7. Ask your child to place the dough-balls onto the baking sheet and bake them for about 10 minutes, or until they begin to turn golden brown on the bottoms.
  8. When you see the slightest bit of color, make sure to remove the cookies from the oven and place them on a cooling rack.
  9. While the cookies are still warm, place them in a small bowl with powdered sugar and toss them gently until fully coated. When the cookies are cool, they are ready to be served!
mexican-wedding-cookies-slide

Kate from learnandgrowbooks.com

Kate is the founder of Learn and Grow Books, which is a website for parents and teachers of pre-K children.

How to Make Paper Mache Pulp

How to Make Paper Mache Pulp

Use this recipe to make a pulp mixture using newspaper and water. It is great to use for adding fine details to your paper mache projects.  You should be able to mold it almost like clay.

Materials Needed:

  • Newspaper
  • Water
  • Salt
  • Glue

Instructions:

Start off by tearing the newspaper into tiny pieces and putting them in a large bowl. Add just enough warm to hot water to completely cover the newspaper. Let it soak several hours or overnight.

Once your newspaper has soaked for several hours, get your hands into it. Play with it, mix it, and squeeze it through your fingers until it looks similar to oatmeal. Try to get as many lumps out as possible. If necessary, add a bit more water and let it soak a little longer.

Once you have it as smooth as possible, add a few tablespoons of salt to help retard mold. Mix it again with your hands. Once mixed thoroughly, squeeze out any excess water and add a few tablespoons of glue. Now you are ready to use your paper mache pulp!

If you don’t want to wait overnight, you can add your newspaper to boiling water and let it boil until the newspaper falls apart. You have to watch this carefully and possibly add extra water if necessary. You can also try letting your newspaper and hot water mixture sit for a few hours and then put it in a blender or food processor. Don’t forget to add the glue and salt once your mixture is smooth!

Tip : “I used your method to boil newspaper pieces in boiling water in order to make paper mache pulp. The method worked. However, the pot that I used was smeared in newspaper ink on the sides. I tried soap, baking soda, vinegar and finally came upon a solution that quickly removed the ink: vegetable oil. I used the oil and a paper towel & was able to quickly remove the residue in the pot. I thought it would be helpful to include this remedy in your article for those of us who end up with dirty pots.”

Store your pulp in an air tight baggie or bowl in the refrigerator for several days!
Kate from learnandgrowbooks.com

Kate is the founder of Learn and Grow Books, which is a website for parents and teachers of pre-K children.

Plant a Fail-Safe Veggie Garden

Plant a Fail-Safe Veggie Garden

What happens when you give kids dirt, a shovel, and a squirting hose? Chances are, a little chaos, and a lot of fun. Now, with summer here, you can add even more delight—and some lasting science lessons too—by throwing seeds into the mix. With just a few inexpensive supplies, you and your child can plant a first vegetable garden together.

Gardening, of course, offers endless possibilities. For children, though, it’s best to start small, with quick, hardy plants. And you don’t need a huge backyard to do it. This easy, “brown thumb-proof” garden fits in a patio planter. Get ready for happy mess!

What You Need:

  • Rectangular planter, at least 2-3’ long, 8” high, and 10-12” wide.
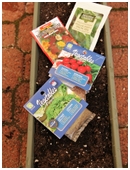
  • 1 seed packet each: radishes, lettuce, nasturtium, and sugar snap peas (look for the dwarf/bush variety, which stand alone).
  • 1 large bag of potting soil (enough to fill your planter)
  • Trowels
  • Watering can
  • Flat sticks for labels

What You Do:

  1. Check the weather and pick your spot. These are cool-weather seeds, but beware of frost: start planting when night temperatures are regularly above freezing! Also, find a spot with direct sun at least several hours daily. If you’ve got a budding scientist, it’s also a great time to point out how plants need light to grow.
  2. Prepare your soil. Gardens always start with good dirt. Empty your potting soil into your planter and smooth the top, but don’t push it down—airy soil will help nourish your seeds.
  3. Plant peas. Plant peas in a row, roughly 2” apart, at least an inch away from one long edge of your planter. To plant, have your child place the seed on top of the soil, and then poke it down about an inch, and smooth the soil over it. Write “peas” on a label and place it at the end of your row.
  4. Plant your other seeds. The other seeds grow well in patches rather than rows. Leave about two to three inches from your pea row, and then mark off three rectangular patches: one each for lettuce, nasturtiums, and radishes. Large-seeded nasturtiums can be planted the same way as peas, at least 3” apart. Lettuce and radish seeds are smaller; sprinkle them out and cover with a light blanket of soil. Once you have planted your seeds, be sure to mark them. Give them a good, gentle drenching as well. This is a great time to talk about how our plants start from seeds of all shapes and sizes. Which seeds are biggest? Roundest? Weirdest?
  5. Tend your garden. The next several weeks are full of delights. Water daily, and you will soon see sprouts. Some of your lettuce and radish plants may be too close together—you can thin them to about 2-3” apart. Help your child identify plant parts: roots, stems, leaves, and flowers.

The best thing about this garden is it’s almost instant gratification—within days you’ll see the first sprouts. Within six weeks, you should harvest your first lettuce and radishes, and within nine weeks you should be able to pick peas and make a bright nasturtium bouquet for the table. Adventurous eaters may even put nasturtium leaves and flowers in a salad! With luck, your harvest will last even longer: your child will begin a lifelong love for a green and growing world.

vegetable-garden-bigthumb

Kate from learnandgrowbooks.com

Kate is the founder of Learn and Grow Books, which is a website for parents and teachers of pre-K children.